The blog post gives you an overview of the steps required to successfully configure a Teams instance for use with Lightwire’s SIP services.
Teams configuration happens in three parts, core tenancy setup of the phone system, the per-user configuration and then the setup for Auto Attendants and Calling Queues.
Here we provide all the detail we believe is necessary to successfully implement the first two parts when followed by a competent systems engineer. Auto Attendants and Calling Queue configuration and design are up to you.
Table of Contents
Part 1: Core Tenency Configuration
Adding our Siphosting calling domain to the Office 365 Tenancy
- During provisioning, Lightwire will allocate and send the nominated technical contact a new unique Fully-Qualified Domain Names (FQDN’s) which will resolve to our Teams Calling Session Border Controllers (SBC’s).
- The address will be in the form of customername.teams.siphosting.co
- You will need to add the Domain Names into the Office 365 Tenancy that they are configuring for Teams Calling by following the Microsoft Add a domain to Office 365 guide (available at https://docs.microsoft.com/en-us/microsoft-365/admin/setup/add-domain?view=o365-worldwide).
- During setup Office 365 will display a TXT VALUE such as ‘MS=865412465’ to verify ownership of this domain. You will need to provide us with this value.
- Lightwire will add TXT DNS records to allow the customer to verify the domains in the Office 365 tenant.
- Once notified by Lightwire that the TXT record has been published in our Public Zone, you can proceed with the setup and verify the domain in Office 365.
- Please leave all the online services (e.g. Exchange, Skype for Business, Mobile Device Management) unchecked.
- Once set up successfully, the status of the domain should read “Setup Complete.”
Prerequisites and connecting to your Office 365 Tenancy
Adding a temporary licenced admin user
In order for 365 to allow for the Direct Routing FQDN to be created as a PSTN gateway, a user needs to be created temporarily using the domain. This user requires an Office 365 and Microsoft Teams Phone Standard license.
If you don’t have a spare license, the Office 365 Enterprise E5 trial can be added to your tenancy and assigned to this user.
1. In the Microsoft 365 admin centre, create a new user: Users > Active Users > Add a User. Name this temporary user how you wish, and ensure the domain selected is the Lightwire provided FQDN.

2. Assign an Office 365 E1 or E3 license, and a Microsoft Teams Phone Standard license, or an Office 365 E5 license to this user.
- Note: This license will not be permanently used. Once the Direct Routing gateway is created the user can be removed and the license relinquished
- Also note: Microsoft Teams Phone Standard – Virtual User licenses do not allow for this process as they are only used for resource accounts.
3. Assign Global Administrator to this user

4. Finish adding. There may be a wait of up to a few hours for propagation through Microsoft’s systems and allow for the next step to be completed.
Connection to Office 365 with PowerShell
Note: for the following, your user should be a Global Administrator or have the correct permissions delegated to complete the configuration in the guide.
1. Open PowerShell as administrator

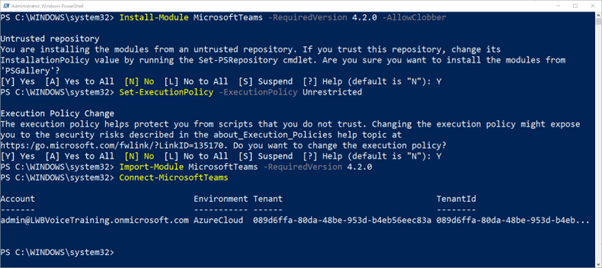
2. Paste the following four commands into the Powershell terminal:
					Install-Module MicrosoftTeams -RequiredVersion 3.0.0 -AllowClobber
Set-ExecutionPolicy -ExecutionPolicy Unrestricted
Import-Module MicrosoftTeams -RequiredVersion 3.0.0
Connect-MicrosoftTeams
Accept the options when you are prompted. You should see similar to the below output:

3. You’ll be prompted to log in. Use your Global Admin login credentials for the Office 365 tenancy
- In the Sign in to your account dialogue box, type your Teams Online administrator password, and then click Sign in.
- Follow the instructions in the Sign in to your account dialogue box to provide any additional authentication information, such as a verification code, and then click Verify.
More information on connecting to and managing Microsoft Teams with PowerShell is available at https://docs.microsoft.com/en-us/microsoftteams/teams-powershell-install.
If you have already installed a previous version of the MicrosoftTeams Powershell module, you can upgrade to the latest recommended version using the below command:
Update-Module MicrosoftTeams -RequiredVersion 4.2.0
Configuring the PSTN Gateway in the Office 365 Tenancy
Create the PSTN gateway
Enter the below command into Powershell, replacing “customername” with your own (from the provided FQDN). Also ensure that MaxConcurrentSessions is greater than or equal to the number of voice channels purchased from Lightwire (ie if you have purchased 20 voice channels, please ensure that this is set to 20 or more).
Please note, this is a single command, and needs to be entered without a line break
New-CsOnlinePSTNGateway -Fqdn customername.teams.siphosting.co -SipSignalingPort 5061 -MaxConcurrentSessions 10 -FailoverTimeSeconds 15 -ForwardCallHistory $true -Enabled $true
You should see similar to the below output:

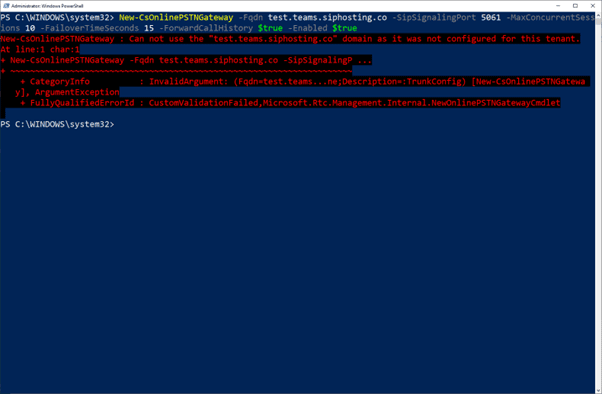
If you receive an error as below, please check to ensure that you have entered the FQDN correctly in the first instance. If you have only just added the global admin user in the previous step you may need to wait a short time before proceeding.

Create the PSTN gateway
Add a new PSTN Usage called “Worldwide” and add it to the “Global” identity:
Set -CsOnlinePstnUsage -Identity Global -Usage @{Add="Worldwide"}
Create Voice Routing Policy
Create a new Voice Routing Policy and add the PSTN usage to this:
New-CsOnlineVoiceRoutingPolicy “Worldwide” -OnlinePstnUsages “Worldwide”

Create Voice Routes
Create a new voice route that routes all calls to the SBCs, and adds it to the PSTN usage created above:
Please note this is a single command and needs to be entered without a line break.
New-CsOnlineVoiceRoute -Identity "SiphostingGateway" -NumberPattern ".*" -OnlinePstnGatewayList customername.teams.Siphosting.co -OnlinePstnUsage @{Add="WorldWide"}

Note: customername.teams.siphosting.co need to be modified to match the FQDN provide in Step 1.
The -Identity “SiphostingGateway” is customisable, e.g. you could call it -Identity “MyCompanyNameGateway”
Core Office 365 Tenancy configuration complete
You have now completed the configuration requirements you can now exit out of the PowerShell Session. At this point you can also remove the temporary user created with the siphosting.co domain, as it is no longer required.
Exit -PSSession
Part 2: Enabling a user and assign a routing policy
Either enable a test user, or use an existing user. Ensure that the user has a Microsoft Teams Phone Standard license. These commands will fail if the user does not have the appropriate license.
Enabling voice, voice mail and assigning the phone number.
Open Powershell as admin and run the following command:
Connect -MicrosoftTeams
Log in using your Microsoft 365 admin credentials when prompted.
Run the below, replacing “username@customerdomain.com” with the required username. Also replace the phone number with the number to be assigned to this user. Please note this is a single command and needs to be entered without a line break.
Set -CsPhoneNumberAssignment -Identity user.name@customerdomain.com -PhoneNumber +6455555555 -PhoneNumberType DirectRouting
To enable voice for a user who does not require a direct dial, use the following command, replacing “username@customerdomain.com” with the required username.
Set -CsPhoneNumberAssignment -Identity user.name@customerdomain.com -EnterpriseVoiceEnabled $true
Allowing calling and assigning the voice routing policy.
Grant the “AllowCalling” policy to the user (replacing the example address):
Grant -CsTeamsCallingPolicy -PolicyName AllowCalling -Identity user.name@customerdomain.com
Grant the “AllowCalling” policy to the user (replacing the example address):
Grant the following policy to the user:
Please note this is a single command and needs to be entered without a line break
Grant -CsOnlineVoiceRoutingPolicy -Identity user.name@customerdomain.com -PolicyName "Worldwide"
Part 3: Resouce Accounts
For more on Auto Attendances and Call Queues in Microsoft Teams, please see the relevant documentation on the Microsoft knowledge base
A Resource Account requires a free Microsoft Teams Phone Standard – Virtual User license.
Assigning a phone number to an Auto Attendant or Call Queue
Lightwire Microsoft Teams Calling phone numbers can only be assigned to resource accounts using Powershell. To assign a number:
Open Powershell as admin and run the following command:
Connect -MicrosoftTeams
Log in using your Microsoft 365 admin credentials when prompted.
Run the below command replacing user.name@domain.com with the username you’d assigned to the resource account, and the phone number with one provided by Lightwire.
Please note this is a single command and needs to be entered without a line break
Set -CsPhoneNumberAssignment -Identity user.name@customerdomain.com -PhoneNumber +645555555 -PhoneNumberType DirectRouting
Technical Notes
Issue:
Some networks provide Anonymous calls as the FROM field within SIP. Teams will translate the word Anonymous to numbers as if it’s an alphanumerically dialled number. This will show the call coming from 266696687 within Teams.
Resolution:
We’d recommend Office 365 administrators add 266696687 as a contact called “Anonymous” within the address book. This will avoid an “Unknown Contact” with the number 266696687 showing in Call Histories confusing end users.
Issue:
You wish to enable 1-to-1 recording of calls in Microsoft Teams
Resolution:
This can be enabled for users with the following PowerShell command:
Set -CsTeamsCallingPolicy -Identity Global -AllowCloudRecordingForCalls $true
This will enable users to start recording their calls from the call window in the same way that meetings can be recorded. When the call ends, the recording will be made available in their OneDrive.
Please note that when activated, an automated message plays to the other party to inform them that the call is now being recorded.
Issue
Users who do not have a direct dial phone number assigned to them present their outbound calls as “Anonymous”. This may impact outbound calling to some carriers.
Resolution
Lightwire can mask all anonymous outbound calling with a single number. Please request this if required.
If you have numbers assigned to resource accounts, used for Auto Attendants or Calling Queues, you can set Caller ID Policies yourself. This provides more flexibility as you can set these up on a per-user basic. To set this up:
- Create a new policy. You can change the “Identity” to any name if you require multiple policies. The description can be set as required as well.
New-CsCallingLineIdentity -Identity MaskOutbound -Description "Mask outbound calls with the reception DDI"
2. Set a variable to retrieve details from the required resource account. The variable name ($ResourceAccount1 in the below example) can be modified per your requirements. Ensure that you replace resourceaccount@domain.com with the UPN of the resource account you’re wanting to mask with.
$ResourceAccount1 = Get-CsOnlineApplicationInstance -Identity resourceaccount@domain.com
3. Create the calling policy, ensuring that the Identity is the one set up in step 1 above, and you use the variable set in step 2
Set-CsCallingLineIdentity -Identity MaskOutbound -CallingIDSubstitute resource -ResourceAccount $ResourceAccount1.ObjectId
4. Assign the policy to users, ensuring that user@domain.com is updated to reflect the user’s account details
Grant-CsCallingLineIdentity -Identity user@domain.com -PolicyName MaskOutbound
Dealing with Skype legacy settings
In the event there is a Lync or Skype for Business on-prem setup floating around in your environment, there may be a few tasks to do if you find you can’t complete the set-up for a user.
With legacy Skype for Business on-prem migrations to Direct Routing, there are some Active Directory Attributes that need to be cleared out and some policy changes.
Key takeaways for migrations are to ensure:
- ‘TeamsUpgradeEffectiveMode’ This should be set to ‘TeamsOnly’
- There are two ways to set this, per user and org-wide
- Direct Routing only works in ‘TeamsOnly’ mode
- Your ‘VoicePolicy’ should be set to ‘HybridVoice’ and not ‘BusinessVoice.’
- If you can’t set OnPremLineURI, that’s assigning a DDI number; then you have msRTCSIP-LineURI populated in the local Active Directory. You need to clear this attribute to unlock the write access to the ‘OnPremLineURI’ online.
- You can do this on individual users by turning on the advance view in Active Directory, opening the user, selecting Attribute Editor and finding msRTCSIP-LineURI, then selecting Clear.
This article is the most comprehensive article I’ve found to identify all the cleanup tasks that need to be completed for users migrating to Direct Routing migration from Skype.
The article includes two scripts, one to find and one to clear all the Skype Attributes on users.
More details on Upgrade from Skype for Business to Teams can be found here.
Policy Settings
Direct Routing only works with users with the Teams Upgrade mode set to TeamsOnly.
I.e. If your users are in Island Mode, you will need to change the users to TeamsOnly.
Using the Microsoft Teams admin centre to change:
- In the left navigation, go to Users, and then select the user from the list.
- On the Account tab for the user, under Teams upgrade, click Edit.
- You can set the mode. Choose from the following option:
- Teams only – Use this setting if you want the user to use only Teams. The user will still be able to join Skype for Business meetings.
That should sort it out on a per-user basis. However, you can set it as a tenancy wide setting.
Changing the mode can take up to 24 hours to apply.
Scope, design, provision and support Teams Phone with Confidence.
Get the free eBook that walks you through all of it without the sales pitch. No forms, no spam, no cold calls. The eBook is 100% free.


